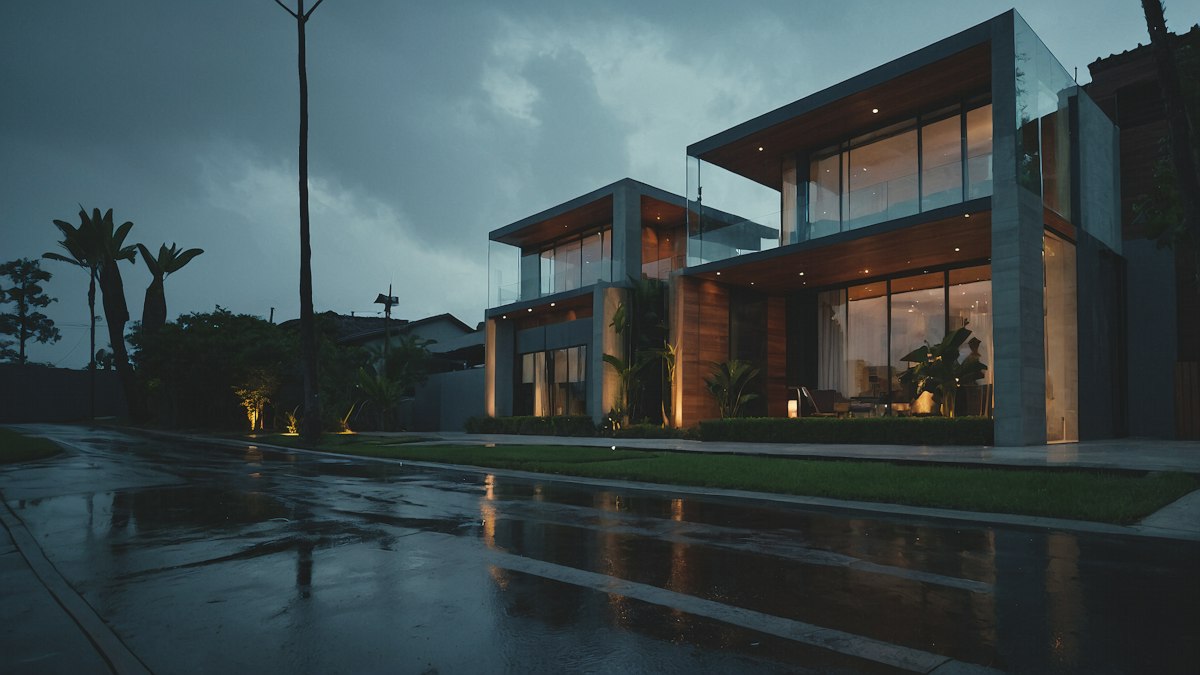
Illuminating Facades: The Art and Science of Exterior Architectural Lighting
When the sun sets, the architectural details of a well-designed property should not fade into darkness. Instead, nightfall offers a blank canvas to highlight textures, create depth, and establish a completely different mood than what is visible during the day. Homeowners and commercial property managers often struggle to find the balance between functional security and aesthetic elegance, resulting in spaces that are either over-illuminated or dangerously dark.
Achieving a professional result requires more than simply pointing a few spotlights at a wall. It demands a careful study of light behavior, shadow play, structural materials, and electrical safety. When executed correctly, exterior lighting transforms a building into a living sculpture, enhancing curb appeal and increasing property value while ensuring safe passage along walkways.
Related posts
Strategic Planning for Exterior Home Remodeling: Budgets, Timelines, and Contractor Management
Watching your home's exterior transform is exciting, but the fear of runaway costs and endless delays can quickly...
Read more →
Designing a Front Door Portico Addition: Drafting Architectural Plans for Curb Appeal and Structural Integrity
Standing in the rain while fumbling for your house keys is a quick way to realize your home's...
Read more →
Top Modern Farmhouse Exterior Facade Renovation Ideas
The modern farmhouse style continues to dominate the home design landscape, offering a perfect blend of cozy rustic...
Read more →
Strategizing a Full Exterior Home Remodel for Maximum Appraisal Value
A full exterior home remodel is a major financial undertaking that can completely transform how your property looks...
Read more →This discussion explores the fundamental design principles, equipment selection criteria, and technical installation steps required to execute a high-performance exterior lighting scheme. We will examine how to layer light effectively, select durable fixtures, and avoid the common installation mistakes that lead to premature system failure.
Whether you are planning a subtle residential upgrade or a striking commercial facade project, understanding these technical and artistic elements ensures a reliable, beautiful outcome. Let us look at how to turn dark exterior walls into striking visual statements.
Key takeaways
- Layering is key: Combine ambient, task, and accent lighting to create depth and prevent a flat, washed-out appearance.
- Select quality materials: Opt for solid brass, copper, or high-grade composite fixtures with minimum IP65 ratings to withstand harsh weather.
- Manage the voltage drop: Calculate cable runs and transformer capacity carefully to ensure consistent brightness across all fixtures.
- Respect the darkness: Use shields, shrouds, and precise aiming to prevent glare and minimize light pollution.
Core Principles of Architectural Lighting Design
Successful exterior design begins with a clear plan rather than a shopping trip for fixtures. The goal is to direct the eye to specific focal points while allowing other areas to recede into shadow. This contrast is what creates drama and visual interest. To achieve this, designers rely on three distinct layers of light.
The Three Layers of Light
Accent lighting is the starting point for architectural design. This layer focuses on specific features such as columns, textured stone walls, unique trees, or archways. By using narrow beam angles, you can draw attention to these details without illuminating the surrounding areas.
Task lighting serves a functional purpose. It illuminates pathways, steps, driveways, and entryways, ensuring safe navigation. Task lighting should be subtle but effective, using downward-directed fixtures to prevent glare from blinding people as they walk.
Ambient lighting provides a soft, overall glow to the space. This is often achieved through indirect light, such as wall washing or downlighting from eaves, which bounces gentle light off large surfaces to create a comfortable background level of illumination.
Understanding Beam Angles and Optics
The spread of light is just as important as its brightness. A narrow spot beam (15 to 24 degrees) is ideal for tall, narrow columns or distant focal points. A medium flood (35 to 45 degrees) works well for general wall washing and medium-sized trees. Wide floods (60 degrees or more) are best reserved for broad facades or expansive garden canopies. Matching the beam angle to the target structure prevents light from spilling into the sky or through windows.
Selecting Fixtures and Materials for Longevity
Exterior lighting operates in a hostile environment. Rain, snow, extreme heat, and soil chemistry constantly challenge the integrity of your fixtures and wiring. Investing in high-grade materials at the start prevents costly replacements and troubleshooting later.
Avoid cheap aluminum or plastic fixtures sold at big-box retailers; these materials degrade quickly, corrode, and leak. Instead, specify solid brass, bronze, or copper. These metals naturally patina over time, blending into the landscape while remaining completely impervious to moisture and corrosion.
Pay close attention to the Ingress Protection (IP) rating. For general landscape and wall-mounted fixtures, an IP65 rating is standard, meaning the fixture is protected against dust and water jets. For ground-recessed well lights that may experience temporary flooding, look for IP67 or higher. Submersible fixtures for ponds or fountains require an IP68 rating.
Step-by-Step Installation Best Practices
A flawless design can be ruined by poor installation. Following systematic electrical and physical installation procedures ensures your system remains safe and operational for decades.
Planning the Layout and Power Supply
Most modern professional systems utilize low-voltage (12V to 24V) alternating current. Low-voltage systems are safer to install, easier to adjust, and do not require deep trenching like line-voltage (120V) systems. Start by calculating your total wattage. Add up the wattage of all planned fixtures and select a multi-tap transformer that can handle at least 120% of that total load to allow for future expansion and system efficiency.
Managing Voltage Drop
As electrical current travels down a wire, it encounters resistance, causing the voltage to drop. If your voltage drops too low, fixtures at the end of the run will appear dimmer or flicker. To combat this, use thicker gauge wire (such as 12-gauge or 10-gauge landscape wire) and utilize the multi-tap terminals on your transformer (such as the 13V, 14V, or 15V taps) to boost the starting voltage for longer runs. Keep your cable runs under 100 feet whenever possible, or use a hub layout where equal lengths of wire run from a central junction box back to the transformer.
Making Waterproof Connections
The single most common cause of system failure is moisture entering wire splices. Traditional wire nuts or electrical tape will fail outdoors. Always use direct-burial, gel-filled wire connectors or heat-shrink tubing designed specifically for wet locations. A perfect, watertight connection prevents corrosion from creeping up the copper wire and destroying the fixture's internal electronics.
Avoiding Common Lighting Mistakes
More light is not necessarily better. Over-lighting is a frequent mistake that flattens architectural features and creates a harsh, institutional look. Instead, embrace shadows; they provide the contrast necessary to make the highlighted areas stand out.
Another frequent error is glare. Fixtures should be positioned so that the light source itself is hidden from direct line of sight. Use fixtures with deep shrouds, hex baffles, or glare shields, and aim them away from seating areas, pathways, and neighboring windows. Respecting the night sky by aiming fixtures downward whenever possible helps maintain local nocturnal ecosystems and keeps your neighbors happy.
Frequently Asked Questions
What is the best color temperature for exterior architectural lighting?
For most residential and commercial properties, a warm white color temperature of 2700K to 3000K is ideal. This range highlights the natural warmth of wood, brick, and stone without looking clinical. Cooler temperatures, such as 4000K or 5000K, can look harsh and blue, though they are occasionally used in ultra-modern commercial settings or for mimicking moonlight high up in trees.
How do I calculate the correct transformer size for my system?
To find the correct transformer size, sum the total wattage of all your LED fixtures and multiply that number by 1.2. This provides a 20% safety margin. For example, if you have fifteen 6-watt fixtures, your total load is 90 watts. Multiplying by 1.2 gives you 108 watts, meaning you should select a transformer rated for at least 150 watts to ensure optimal performance.
What is the difference between line voltage and low voltage systems?
Line voltage systems operate at 120V, matching the standard power of your home. They require conduit, deep trenches, and professional electrical permits. Low-voltage systems step the power down to 12V or 24V using a transformer. They are incredibly safe, do not require deep burying, allow for easy fixture adjustments, and are highly energy-efficient, making them the standard choice for modern architectural projects.
How do I prevent glare into windows or neighboring properties?
Glare control relies on fixture selection and placement. Choose fixtures equipped with integrated shrouds, directional shields, or louvers. Avoid aiming lights directly at windows or boundaries; instead, position fixtures close to the facade pointing upward or downward at a steep angle, or use downlights mounted under roof eaves to wash walls vertically.
What IP rating is required for outdoor ground fixtures?
Fixtures installed flush with the ground, such as well lights, should have a minimum rating of IP67. This ensures they are completely dust-tight and can survive temporary immersion in water during heavy downpours or when puddles form on the lawn. For standard wall-mounted or tree-mounted fixtures, IP65 is generally sufficient.
Conclusion
Thoughtful exterior architectural lighting is a powerful investment that merges security, accessibility, and high-end design. By focusing on the core principles of layering, selecting professional-grade brass or copper fixtures, and executing precise electrical connections, you can create an outdoor environment that is both visually stunning and incredibly reliable. Take the time to plan your layout, manage your voltage drops, and respect the natural beauty of shadow. The result will be a striking nighttime landscape that enhances your property's character for years to come.